Polar Alignment Using the Drift Method
While there are several options for getting precision polar alignment, few beat the Drift Method because by watching a star drift, you are compensating not only pointing the polar axis of your equatorial mount, you also are getting the benefit of compensating for flexure of the mount/telescope combination. Astrophotographers, and those who want the best GOTO pointing performance from their mount should consider the Drift Method.
Let's review polar alignment is:
By the late 1700's, most mountings that could hold telescopes in steady position were largely of the type that could rise up and down (the altitude movement), and/or could be moved from side-to-side (the azimuth movement). But this did not solve the problem of steadily tracking celestial objects as they rose in the east, making an arc across the sky, and set in the west.
The task of tracking objects across the sky was solved by telescope designers in the early 1800's, most notably by British astronomical instrument maker Edward Troughton with the 3-inch "Troughton Equatorial Telescope" that was finished in 1795, and the German optician and telescope maker Joseph von Fraunhofer with his "Great 9-inch Dorpat Refractor" that was finished in 1824.
The telescope is placed on one end of the declination axis (top left in image), and a suitable counterweight on other end of it (bottom right). The right ascension axis has bearings below the T-joint, that is, it is not supported above the declination axis.
Drift alignment requires the use of a high power eyepiece, preferably with an illuminated crosshair, or you can defocus a bright star so that the out of focus star nearly touches the edges of the eyepiece field of view. Using a 2X or 3X Focal Extender lens will help speed up the process.

Here are the steps for Drift Method Polar Alignment (note that this works if you can find the pole star in the sky or not, and works in Northern or Southern hemispheres). Here are the steps:
1. Perform a rough polar alignment. Place the eyepiece (or eyepiece/focal extender combination) into the eyepiece holder of the telescope.
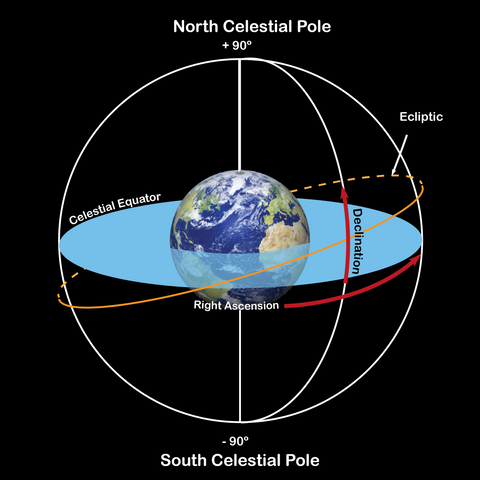
2. Point the telescope, with the telescope's drive running, at a moderately bright star more or less overhead, where the meridian (the North-South line passing through your local zenith) and the celestial equator intersect. For best results, the star should be located within ±30 minutes in R.A. of the meridian and within ±5° of the celestial equator. Pointing the telescope at a star that is straight up, with the Declination set to 0°, will point the telescope in the right direction. Practice moving the scope back and forth in declination so that you know which direction if north and south in the eyepiece.
3. Note the direction of the star’s drift in Declination (disregard drift in Right Ascension as this is probably due to periodic error of the drive):
⦁ If the star drifts South the telescope’s polar axis is pointing too far East.
⦁ If the star drifts North, the telescope’s polar axis is pointing too far West.
4. Move the azimuth (horizontally) adjustment of the equatorial mount, and keep repositioning by small amounts, the telescope’s East-West polar axis orientation until there is no further North-South drift by the star. Track the star for at least 5 times longer than your longest imaging exposure to be certain that its Declination drift has ceased (so for instance if you are shooting 1 minute subs, check to see if drift ceases for at least 5 minutes). Once you are satisfied that drifting has ceased with the azimuth polar pointing of the equatorial mount you have finished the first half of the Drift Alignment process.
5. The next half of the Drift Alignment will be compensating for the altitude adjustment of the mount. To start, find a bright star about 20° to 30° above the Eastern horizon and within ± 5° of the celestial equator.
6. Watch the star to see if the star drifts in Declination:
⦁ If the star drifts South, the telescope’s polar axis is pointing too low.
⦁ If the star drifts North, the telescope’s polar axis is pointing too high.
7. Use the altitude adjust control on the mount to make appropriate changes in altitude, based on your observations. Track the star for at least 5 times longer than your longest imaging exposure to be certain that its Declination drift has ceased. You will notice that you are adjusting the mount in the correct direction if the drifting slows down. Then it is best to make very fine adjustments, until drifting is undetectable.
The final result is you will have a perfect or near perfect polar alignment.
Note that if you plan to use an autoguider, many astrophotographers prefer to be very slightly off in polar alignment so that guide corrections are always in the same direction. This loads the gears and keeps the declination drive always pushing in the same direction. Sometimes if the mount is perfectly polar aligned while using an autoguider, the autoguiding system can chase star scintillation and result in making corrections both North and South. Because the declination motor is not driving and loading the gears like the RA motor does, it sits there idle until a drive correction is given. If it changes direction, then the very slight amount of gear lash that is present from going to North to South can ruin your autoguiding performance.

